Showing posts with label Crafts - Autumn. Show all posts

Saturday, October 31, 2015

Fabric Acorns

Check out more free craft ideas at http://www.allcrafts.net/thanksgiving.htm
 
 
Are these not the cutest little acorns EVER!!!
 
I absolutely LOVE them and think they are so much FUN!
They're perfect for fall, but I also think you could tie a cluster together and hang as a Christmas ornament, or tie a few to the top of a gift, or how about threading one on an autumn necklace for a little girl... so many possibilities.


They're so little and cute and bright and exciting... and I wish a had a whole bowl of them just like this one! Sadly, I wasn't the one who made them and therefore don't have any.  BUT, Lisa, my sister, was nice enough to share her photos and tutorial with us. Thanks, again for sharing your crafts Lisa!
 
Here are her fabulous instructions for anyone with half the patience she has.
 
 
I made a template, and cut out the fabric.  (My template was 1 3/4 inches from top to bottom tip and
 1 3/4 inches across at its widest point.  The size of the acorn all depends on the size of the hats that you find though.)  You need 2 pieces for each acorn.
 
With the right sides together, sew 1/4 inch seam around the fabric leaving the top open (straight edge open).


Flip the fabric right side out (seam is now on the inside) and baste around the top.  Leave the strings long enough that you can get a good grip to tie them closed later.
   
Fill the acorns with stuffing, pull the basting tight and tie off the tops.  The tighter you stuff the acorn the less puckers and gathers you will have at the top. (I think its cuter that way.)
   
Using hot glue, glue the acorn hats on the top of the fabric acorn.
 
Before I used the acorn hats I put them in hot soapy water and let them soak for about an hour.  Rinse them off and lay them on a towel over night to dry.
 
Thanks so much Lisa! You're amazing!


here's where we link

Friday, October 2, 2015

Tissue Paper Sunflower

http://www.freekidscrafts.com/tissue-paper-sunflower/
 

This sunny Tissue Paper Sunflower was designed by the FreeKidsCrafts Team to bring sunshine into your room.

Supplies


White Cardstock or Heavyweight Paper

Yellow Tissue Paper

Black Sunflower Seeds or black tissue paper

Tacky glue

Scissors

Newspaper

Paper Plate

Instructions


Click on Printables and print out Sunflower Pattern.  Cut out and place on newspaper.

Cut Yellow Tissue Paper into small squares and crumple up.

Put small quantity of tacky glue on paper plate and dip crumpled tissue paper into it. 
Place glue side down on yellow leaves of sunflower until all the leave are covered. 
Spread tacky glue on black portion of sunflower and cover with sunflower seeds. If you do not have sunflower seeds, use crumpled black tissue paper. 
Make a whole bouquet to brighten your bulletinboard or room.

Sunday, September 6, 2015

Fall Porch and DIY Reclaimed Wood Welcome Sign

Creative Ideas


As you know I love Fox Hollow Cottage.  You absolutely must visit her site.  Here is another wonderful project from Shannon.  The full tutorial is provided through the link.  http://foxhollowcottage.com/2013/10/fall-porch-and-diy-reclaimed-wood-welcome-sign.html

Fall Porch and DIY Reclaimed Wood Welcome Sign

Used with Permission by Shannon at Fox Hollow Cottage


Hi again, Fox Hollow Cottage Readers! I'm so happy to be back this month with another project!

And this one just happens to be huge! Literally. 

With the change of season, I've been busy sprucing up our front porch. And this year, I decided to make visitors feel extra welcome with this huge sign!
 

Here's how I made it! It was SO easy!

I started with these pre-cut letters from Hobby Lobby!

And then I painted them with some left over exterior paint - Wrought Iron by Benjamin Moore

Once the letters were dry, I placed them on my weathered board (which I snagged from my parents farm, just like this one).

Once I was sure everything would fit with the proper spacing, I used my super hot hot glue gun and glued them right onto the board. Those letters are stuck!

Then I just propped it up on our front porch. COMPLETELY easy!


And it looks a-mazing!

And so welcoming!

Heck, even I feel welcomed walking up!

I'm in love with the combination of the aged wood, rusty nails, sleek letters and cornstalks... which I chopped down from our field!

Our front entry is officially dressed for fall. 

I'm in disbelief of how amazing this project looks for how easy it was to make! Those are the best kind!


Happy Fall!

Monday, October 27, 2014

Decoupaged Leaves

Used with Permission from Crafts for All Seasons www.crafts-for-all-seasons.com

If you decoupage leaves after they have been dried, they will keep their color and vibrancy! 


So on your next walk collect some beautiful autumn leaves. Bring them in and dry them between sheets of newspapers for about two weeks or more.  After that, they can be decoupaged onto a recycled glass jar (I used a pasta jar).

When you place a votive candle inside, the light shines through the leaves, creating a beautiful effect.  The leaves are not as thin as paper or napkins (which are commonly used decoupage items) but the leaves still work well. If you use large leaves that can be a bit thicker, you must be patient and hold the leaves down until the mod podge adheres.  I found that this project works easier with small leaves as opposed to large ones. This project would be difficult for small children, and is better suited for adults.

Things Needed to Decoupage Leaves:
•    Collection of fall leaves, freshly fallen (do not pick up ones that are already crisp and dried out)
•    Newspaper
•    Heavy books
•    Decoupage medium, such as Mod Podge
•    Paintbrush
•    Recycled jar
•    Jute, thin rope, raffia, or ribbon
•    Heat resistant glue
•    Votive candle in a votive candle holder

1. Place the leaves between two pieces of newspaper. Do not overlap or stack the leaves on top of one another. Place a heavy book on top of the leaves and allow the leaves to dry and flatten for a minimum of two weeks, or longer.

2. Remove any labels from the jar and wash with warm soapy water. Allow the jar to dry well.

3. Paint decoupage medium in a nice thick layer on one area of the jar.

4. Choose a dried, pressed leaf and apply it to the decoupage. If the leaf is large, you may have a problem with the edges are not adhering. If this happens, hold down the edges until the decoupage medium adheres. This is the part that takes some patience, and there usually is no problem if you use small leaves.

5. Choose another leaf and place it near the first one, perhaps overlapping it slightly. You choose the pattern here. The more the leaves overlap, the less light will show through when the candle inside is lit.

6. Once all the leaves are on, go over the entire jar, and all the leaves, with a coat of decoupage medium and allow to dry. There may be some edges of the leaves that aren't adhering flush to the jar. That's OK! That's what makes this craft look great; these are real decoupage leaves!

7. Reapply at least three coats of decoupage medium to the entire jar, allowing it to dry in between. Mod Podge protects the jar, so these extra coats are important. I used the gloss version of Mod Podge and I really liked how it made the leaves look glossy.

8. Using a strong heat resistant glue, wrap and secure jute, thin rope, raffia, or a ribbon around the mouth of the jar if you want to cover up the threads near the mouth of the jar.

9. Place a votive candle inside. I recommend placing the votive candle or tea light within its own small votive glass holder, and then lower this into the jar. That way, when the candle wax melts, it isn't all inside your decoupage leaf jar and only inside the votive candle cup.

Wednesday, September 24, 2014

Bread Dough Pumpkins

Thanks to Jill Lane in Virginia for this cute autumn craft idea!

Mix until smooth:

2 cups white flour
1 cup salt
3/4 cup hot water

If the dough is still a little sticky, add more flour.  If too dry, add more water until it's easy to handle.  Knead until the dough is elastic.  Make a ball, flatten it a bit and use a knife to make creases in the pumpkin.  Stick a twig in the top for a stem.  Bake at 180 degrees for 20 minutes.  It might be a good idea to let them dry even more overnight before painting them.

Paint pumpkins and add raffia or ribbon bows to the stems.

Aren't they cute?


                                                                Jill Lane's photo

Here's another version of making bread dough pumpkins, using lacquer and glitter as well:


http://www.ehow.com/how_4487349_make-salt-dough-pumpkins.html


Monday, September 22, 2014

Outside with Kids: 15 Ways to Play with Nature

Wonderful and fun ideas for spending time with your children!
These can also be saved on Pinterest!

http://on.apttherapy.com/3ruzRX


I don't know about you, but Fall is one of my favorite times of year. My kids and I get outside more than ever: I love the cooler temperatures and the fact that we don't have to worry as much about constantly slathering on sunscreen or getting eaten alive by mosquitos. And the colors are the absolute best! My kids are constantly coming home with collections — rocks, sticks, leaves, and yes, even pockets full of carefully collected mulch. Rather than throw out all of those amassed treasures, we often try to put them to good use. Here are 15 of my favorite crafty projects to do just that — so get your kids outside and play with some nature already!

ROW ONE

1. Leaf Insects: Modern Parents Messy Kids
2. Painted Sticks: Nature Linc Farrington
3. Flower Stained Glass Window: Artful Parent
4. Leaf Crown: Varpunen
5. Yarn-Wrapped Sticks: Aesthetic Outburst

ROW TWO

6. Nature Color Wheel: Playful Learning
7. Leaf Drawing and Doodling: Artful Parent
8. Fall Leaf Animals: Handmade Charlotte
9. Layered Leaf Art: Amanda K. by the Bay
10. Wax Paper and Crayon Leaves: Vanessa Christenson
ROW THREE
11. Clay Leaf Mobile: The Craft Train
12. Handmade Stick Boats: Minieco
13. DIY Painted Stones: Giochi di Carta
14. Nature Crowns: Small Hands Big World
15. DIY Story StonesPaint on the Ceiling

Monday, January 20, 2014

Orange Pomanders: A Craft that Will Last for Years

by Lois Breneman - Heart to Heart - 2014 

This project is perfect for doing with your older children or with girlfriends, such as "Girls' Night Out!"  It's easy to talk while you craft this fun project!  My sister-in-law, Linda, makes these every Thanksgiving with her daughter and daughters-in-law to add to their bowl of fragrant spicy pomanders each year.  They even made small pineapple pomanders recently, covered in the same way!  Linda Walker in Pennsylvania is my inspiration for this project!

I saw orange pomanders for sale online with a beautiful bow and a cinnamon stick at the top for more than $35 including shipping.  These would make wonderful gifts as well as decorations in your own home.  I keep mine setting out all year long. 


Supplies:

1. Fresh Orange (I used an orange with a thinner skin, verses a naval orange with a thick skin, but either will work fine.)

2. Metal or wooden skewer (to make it easier on your fingers as you push each whole clove into the orange)

3. Bottle of whole unbroken cloves (I bought mine in bulk at a lower price at our natural foods co-op)

4. Container of powdered alum or orris root (preservatives found with spices - a must if you want your orange not to get moldy and rot)  I will refer to only alum in this article.

5. Ground cinnamon, cloves, nutmeg, and allspice (choose the ones you want, but definitely cinnamon and cloves)

6. Ziplock bag (gallon size if making more than one or saving mixture for another year)

     Photo of the supplies, except for the bag of spice and alum mixture.  The skewer was shortened, making it easier to handle.

The best way to cover an orange with cloves so it will last for years, is to cover it completely, rather than make a design.  If covered completely, it will keep for years.  Those with designs where part of the orange rind is showing tend to mold or rot.

Directions:
1. Starting at the top of the orange, remove the part that attached to the stem, poke a hole there with the skewer, and insert a whole clove by pushing the pointy end into the hole. 

2. Poke more holes next to the first clove, so there will be no spaces of orange showing through after the cloves are inserted.  After you get the idea, you can poke an entire row of holes before inserting the whole cloves. This will take quite a while, and don't rush the process.  Enjoy listening to music or the radio - or listening and talking with family or friends. 

3. After your orange is studded completely, pour at least 1 Tbsp. alum into a Ziplock bag, with a large container of cinnamon and a few tablespoons of ground cloves.  Mix well.  Dollar Tree has cinnamon in large containers for a dollar.  Extra alum won't hurt either.

4. Wet the clove-studded orange with water, and shake off extra drops.  While wet, put the clove-studded orange into the bag of alum and spice mixture and gently turn the bag until the orange is completely coated with alum.  This is what will make your beautifully scented orange last for quite a few years.  Without alum, your time, energy, and money will be wasted.  Gently tap the orange on your other hand to get rid of any excess powder.  Place on a paper towel or tea towel and turn it a little each day as it completely cures.  Continue turning for 2 weeks so all the sides will dry out.  

5.
Save any alum and spice mixture for future orange pomanders.  Label the bag.  Add more spices and alum when the mixture is running out
The clove-studded orange pomander I made three or four years ago when my daughter-in-law and I each made one together, is still looking nice, setting in a small glass bowl.  My sister-in-law, Linda, has quite a few pomanders setting in a wooden bowl, lined with an antique cloth.  When the aroma fades, a few drops of  essential oils (wild orange, clove bud and cinnamon) give pomanders renewed refreshment.  I hope you'll give these a try!


Below is another orange I started last night after this was posted.  I used a juicy orange with a thin skin, as I did for the one above.  You can see the juice oozing out in the front.  It smelled so good, and juice ozzing out is not a problem.  I will need to fill in with small cloves to completely cover the orange peel in that area.  It's a good idea to refrigerate any partly completed orange to keep it fresh.  Tonight I plan to finish it.  Then I'll coat it with the spice and alum mixture, by following the recipe above.


Saturday, December 28, 2013

A Grandma Who Makes Crafts with Her Granddaughters

Ruth Ann Assaid in Virginia gave permission to share this story with all of you ladies.  Thanks so much for sharing this, Ruth Ann!

          I babysit my granddaughters one day a week when their mommy, Erin, works.  I like to do a little craft with them.  Yesterday I went over all prepared to make the fall leaves you had on your newsletter/blog.  http://www.heartfilledhome.blogspot.com/search/label/Crafts%20-%20Autumn  I was excited to be doing this craft with them.  I walked in their kitchenette where they were finishing breakfast, and there on the window were the fall leaves!  I couldn't believe it.  Their Daddy was there and he didn't know anything about it, so when Erin got home I told her that was the exact craft I was going to do with them (and we did it anyway).  She said to herself, "Now where did I get that pattern?"  I said, "I got it from Lois Breneman," and she said, "Yes that's exactly where I got mine!"  I couldn't believe it.
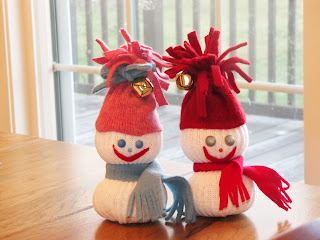
          Last week I made the little sock snowmen with them.  They loved them.
         
Note from Lois:  This week I made these sock snowmen with my five year old grandson, Daniel.  A fun and cute project!  The hats and scarves were made from wool that I had felted by washing in very hot water in the washing machine, and drying on high heat.  The felting allowed me to cut the tassels without any raveling.  Felted wool cuts like butter!  We used a low melt hot glue gun to add the hats, scarves, bells, buttons for eyes and the felted mouth.  A super fun project!


Then in February, 2014, my granddaughter made this one with me during a visit in her home.  She enjoyed it so much that when her next door neighbor friend visited she made one as well!