An easy-to-follow tutorial for a beautiful Christmas project!
http://quiltingdigest.com/fabric-snowflakes-are-simply-magical/
Many more quilting tips, sewing projects, and crafts can be found here:

Inspirational Home and Family Blog
Showing posts with label Crafts - Winter. Show all posts
Showing posts with label Crafts - Winter. Show all posts
Thursday, November 17, 2016
Friday, January 1, 2016
January Wreath
Used with Permission by Lindee Katdare http://thelindeetree.com/january-wreath/

For me, the month of January is kind of a bummer. We have taken down all of the Christmas decor and the house feels bare, cold and boring. Our social calendar has slowed down and we have more time to spend in our drab environment. So that being said, this is a great month to start working on projects. I can't stand sitting inside waiting for spring. So far this month, I have created numerous decor projects and finally installed french doors in my husband's office (blog post to come!). I spent one week with the flu and am finally back up and running. I was ready to tackle our depressing front door with a cheerful wreath!
I
made a wreath a couple of years ago that has obviously lived its life.
Instead of sending it out to be buried, I decided to up-cycle it. I
loved the sparkly pine base and the base was in great condition. I
wanted to create something bright, cheerful and seasonal. I have
definitely had my fill of pine cones for the year so I wanted to do
something different. I went to my favorite hangout, Jo-Ann Fabric and
Craft Stores. I found the berries, greenery and flowers there. I used a
coupon and they were running a promotion in the floral department, buy
one get one free. I spent about $15-$20 on everything. The lemons came
from Pottery Barn and were $16.00 for a bag of six, about $2.60 each.
Kind of pricey, but any time you buy nice quality fruit you are going to
have to pay for it. Besides, I still have a couple to spare and they
look pretty in a little glass bowl on my shelf.
So,
for about $30 I made a beautiful wreath with high quality materials. I
looked online for some other wreaths made with similar products and they
averaged about $70.00. I am so glad I made mine instead. I was able to
make exactly what I want, did not waste material, and saved money.
Sounds like a win to me! What do you think?
I love to receive feedback from my readers. What are you working on this month?

American
wife to this Indian life. I am a right-brained, American woman married
to a left-brained Indian man. I love art, design, up-cycling and
multiple DIY projects at the same time. He loves simplicity and order.
Follow us on this cultural collision as I combine our personalities and
cultural differences through art, design, food, and raising kids. When I
am not working on a craft or project, I co-host a
lifestyle/entertainment show called "Daytime Blue Ridge," on our local
NBC affiliate, WSLS 10. www.DaytimeBlueRidge.com
Tuesday, December 15, 2015

Tuesday, December 1, 2015
How to Turn a Dollar Tree Ornament into Frosty's Vintage Top Hat
Used by permission from Shannon
foxhollowcottage.com/2014/11/how-to-turn-a-dollar-tree-christmas-ornament-into-frostys-vintage-top-hat.html

When I saw these ornaments at the Dollar Tree I thought they were cute, but I knew I wanted to put a Fox Hollow spin on them, with some fat ribbons and maybe a little vintage flair.

They totally remind me of Frosty’s top
hat. Even though Frosty’s didn’t look like this. I guess it’s a top hat +
Christmas that just gives me that nostalgic connection. Anyhoo… ready
for another round of “cheap&easy?
Good!
To make:
1. Buy Dollar Tree ornaments. You can make top hats ornies from scratch, but for a dollar, I’m happy to use this base! They come in Red, Black and Silver (to my knowledge)
2. Remove the apple green sparkly bits. The hat is made of styrofoam, so apply firm, even pressure, and pull. A wee chunk will come out. No worries, your hat band will cover it!

3. Use ribbon, scrap fabric, craft paper, scrap book paper, etc.. to make a band. Wrap around and secure. I used a glue gun. A straight pin would probably work too in a pinch!
4. Add your embellishments. Ribbon, sprig of greenery, tinsel garland (from Dollar Tree, it’s sparse and perfect) flashy buttons, rhinestones, tiny ornaments, an old earring, a tiny snowflake, etc… a mini monogram would be adorable! Basically anything to scale, you want the visual weight to be balanced.

These would be extra cute on a Frosty The Snowman tree.
Have you seen them? They are adorable themed trees. My sister did a flocked one, with a big top hat as the tree topper and it was so, so cute. It really put out a strong Christmas vibe at her house! You couldn’t help but love it. I sure wish I was blogging then, so I could share a photo of it. I didn’t even have a cell phone back then. Well, I may have, but it didn’t take pictures that’s for sure. Can you even imagine?
How did I survive?

foxhollowcottage.com/2014/11/how-to-turn-a-dollar-tree-christmas-ornament-into-frostys-vintage-top-hat.html
When I saw these ornaments at the Dollar Tree I thought they were cute, but I knew I wanted to put a Fox Hollow spin on them, with some fat ribbons and maybe a little vintage flair.
Good!
To make:
1. Buy Dollar Tree ornaments. You can make top hats ornies from scratch, but for a dollar, I’m happy to use this base! They come in Red, Black and Silver (to my knowledge)
2. Remove the apple green sparkly bits. The hat is made of styrofoam, so apply firm, even pressure, and pull. A wee chunk will come out. No worries, your hat band will cover it!
3. Use ribbon, scrap fabric, craft paper, scrap book paper, etc.. to make a band. Wrap around and secure. I used a glue gun. A straight pin would probably work too in a pinch!
4. Add your embellishments. Ribbon, sprig of greenery, tinsel garland (from Dollar Tree, it’s sparse and perfect) flashy buttons, rhinestones, tiny ornaments, an old earring, a tiny snowflake, etc… a mini monogram would be adorable! Basically anything to scale, you want the visual weight to be balanced.
5. Lastly,
the gold ornament hanger attachment was very “cheap plastic-y gold” so I
chose to paint mine with a dab of craft paint. Black on the one with
the polka dot ribbon and pale gold on the one with the little vintage
ornament. It really completed the mini transformation. Don’t worry, it
doesn’t have to be prefect, just bad with a little craft brush and call
it good! You’re mainly just toning down the cheap-y gold look.
And then… you are all done, and you have a supah-cute Frosty top hat ornament that can be the highlight of your tree, or even a gift topper!These would be extra cute on a Frosty The Snowman tree.
Have you seen them? They are adorable themed trees. My sister did a flocked one, with a big top hat as the tree topper and it was so, so cute. It really put out a strong Christmas vibe at her house! You couldn’t help but love it. I sure wish I was blogging then, so I could share a photo of it. I didn’t even have a cell phone back then. Well, I may have, but it didn’t take pictures that’s for sure. Can you even imagine?
How did I survive?
Thursday, April 30, 2015
Easy FIx for Draft Under Your Door!
|
|

|
|
Tuesday, January 6, 2015
Draft Dodgers
by Nina Graff in Michigan
Here's another budget tip. (I DO try to find ways to DIY, with not so much expense). I've been talking about making 'draft dodgers' for the patio doors (or as I call them, window sausages!)… LOTS of temperature exchange going on there! Well…. another week of below temps spurred me into action.
I was brainstorming about what to stuff them with…that would insulate, but be cheap. Couldn't see wasting that quantity of rice or beans! SO--- wood pellets to the rescue! A 40# bag costs about $4, and one bag filled 6 sausages last night. (6"x35")
I made them out of canvas drop cloth…. a fabric I've come to LOVE! (Made curtains last year out of some. Very natural looking… and affordable!) I tied the bags up with jute…. and they will help quite a bit with that NW wind.

Tuesday, December 9, 2014
How to Make a Coffee Filter Wreath (with Burlap Roses)
used with Permission by Shannon of Fox Hollow Cottage
http://foxhollowcottage.com/2012/10/how-to-make-coffee-filter-wreath-with.html
(Visit Shannon's website for a picture tutorial)
You Will Need:
1. A wreath form. (Mine is a Dollar Tree cheapy.)
2. Fabric to cover the form. (white is recommended!)
I used some white scrap fabric I had hanging around.
3. Glue and Glue Gun.
*Low temp is fine and what I used.
4. Coffee Filters! I used about 75 for my fat little wreath.
You can get these at the Dollar Tree.
5. Burlap. (optional for flowers)
You can use any fabric you like to match your decor!
Directions:
Step One-
Cut your fabric into a long strip (or 2) and wrap it around your wreath, then secure with glue. This will camouflage your wreath form and give your filters a little something more to stick to.
Step Two-
Get your filters and get comfy!
You’ll start be scrunching them up (so technical)
and getting the bottom into a point.
Then fluff out the ends and straighten up.
Finally, twist & pinch the end.
Step Three-
Start gluing. It’ll feel like a slow start to get the wreath looking full, but keep going and fill them in. I glued about a thumbs length of the twisted end section onto the wreath form.
See, it’s getting fluffier!!
I add a few to fan out on the sides and get a fuller, more uniform look.
I figure.. as long as it looks good from the front, right?
The wall won’t know ;)
I added some burlap roses to mine.
I thought it needed a little more texture and interest, which worked out great, because it’s even more versatile with that pinch of burlap.
After all that fluffing, gluing and flower making.. you should have yourself a wreath.
I think the coffee filter wreaths are sort of like fingerprints… so it won’t be exact!
Just love the wreath YOU made.
Mine is a little wonky, but it grew on me.
Lots of Christmas Ideas from Previous Newsletters!
http://heartfilledhome.blogspot.com/p/christmas.html
Lots of Recipes for Christmas!
http://heartfilledhomerecipes.blogspot.com/p/dessertsholidays.html
Monday, January 20, 2014
Orange Pomanders: A Craft that Will Last for Years
by Lois Breneman - Heart to Heart - 2014
This project is perfect for doing with your older children or with girlfriends, such as "Girls' Night Out!" It's easy to talk while you craft this fun project! My sister-in-law, Linda, makes these every Thanksgiving with her daughter and daughters-in-law to add to their bowl of fragrant spicy pomanders each year. They even made small pineapple pomanders recently, covered in the same way! Linda Walker in Pennsylvania is my inspiration for this project!
I saw orange pomanders for sale online with a beautiful bow and a cinnamon stick at the top for more than $35 including shipping. These would make wonderful gifts as well as decorations in your own home. I keep mine setting out all year long.

Supplies:
1. Fresh Orange (I used an orange with a thinner skin, verses a naval orange with a thick skin, but either will work fine.)
2. Metal or wooden skewer (to make it easier on your fingers as you push each whole clove into the orange)
3. Bottle of whole unbroken cloves (I bought mine in bulk at a lower price at our natural foods co-op)
4. Container of powdered alum or orris root (preservatives found with spices - a must if you want your orange not to get moldy and rot) I will refer to only alum in this article.
5. Ground cinnamon, cloves, nutmeg, and allspice (choose the ones you want, but definitely cinnamon and cloves)
6. Ziplock bag (gallon size if making more than one or saving mixture for another year)
Photo of the supplies, except for the bag of spice and alum mixture. The skewer was shortened, making it easier to handle.

The best way to cover an orange with cloves so it will last for years, is to cover it completely,
rather than make a design. If covered completely, it will keep for
years. Those with designs where part of the orange rind is showing tend
to mold or rot.
Directions:
1. Starting at the top of the orange, remove the part that attached to the stem, poke a hole there with the skewer, and insert a whole clove by pushing the pointy end into the hole.
2. Poke more holes next to the first clove, so there will be no spaces of orange showing through after the cloves are inserted. After you get the idea, you can poke an entire row of holes before inserting the whole cloves. This will take quite a while, and don't rush the process. Enjoy listening to music or the radio - or listening and talking with family or friends.
3. After your orange is studded completely, pour at least 1 Tbsp. alum into a Ziplock bag, with a large container of cinnamon and a few tablespoons of ground cloves. Mix well. Dollar Tree has cinnamon in large containers for a dollar. Extra alum won't hurt either.
4. Wet the clove-studded orange with water, and shake off extra drops. While wet, put the clove-studded orange into the bag of alum and spice mixture and gently turn the bag until the orange is completely coated with alum. This is what will make your beautifully scented orange last for quite a few years. Without alum, your time, energy, and money will be wasted. Gently tap the orange on your other hand to get rid of any excess powder. Place on a paper towel or tea towel and turn it a little each day as it completely cures. Continue turning for 2 weeks so all the sides will dry out.
5. Save any alum and spice mixture for future orange pomanders. Label the bag. Add more spices and alum when the mixture is running out
 | ||||||||||||||||||||||||||
Below is another orange I started last night after this was posted. I used a juicy orange with a thin skin, as I did for the one above. You can see the juice oozing out in the front. It smelled so good, and juice ozzing out is not a problem. I will need to fill in with small cloves to completely cover the orange peel in that area. It's a good idea to refrigerate any partly completed orange to keep it fresh. Tonight I plan to finish it. Then I'll coat it with the spice and alum mixture, by following the recipe above. |

Saturday, December 28, 2013
A Grandma Who Makes Crafts with Her Granddaughters
Ruth
Ann Assaid in Virginia gave permission to share this story with all of
you ladies. Thanks so much for sharing this, Ruth Ann!
Note from Lois: This week I made these sock snowmen with my five year old grandson, Daniel. A fun and cute project! The hats and scarves were made from wool that I had felted by washing in very hot water in the washing machine, and drying on high heat. The felting allowed me to cut the tassels without any raveling. Felted wool cuts like butter! We used a low melt hot glue gun to add the hats, scarves, bells, buttons for eyes and the felted mouth. A super fun project!
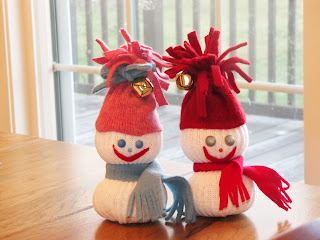
Then in February, 2014, my granddaughter made this one with me during a visit in her home. She enjoyed it so much that when her next door neighbor friend visited she made one as well!

I babysit my granddaughters one day a week when their mommy, Erin,
works. I like to do a little craft with them. Yesterday I went over
all prepared to make the fall leaves you had on your newsletter/blog. http://www.heartfilledhome.blogspot.com/search/label/Crafts%20-%20Autumn
I was excited to be doing this craft with them. I walked in their
kitchenette where they were finishing breakfast, and there on the window
were the fall leaves! I couldn't believe it. Their Daddy was there
and he didn't know anything about it, so when Erin got home I told her
that was the exact craft I was going to do with them (and we did it
anyway). She said to herself, "Now where did I get that pattern?" I
said, "I got it from Lois Breneman," and she said, "Yes that's exactly
where I got mine!" I couldn't believe it.
Last week I made the little sock snowmen with them. They loved them.
Note from Lois: This week I made these sock snowmen with my five year old grandson, Daniel. A fun and cute project! The hats and scarves were made from wool that I had felted by washing in very hot water in the washing machine, and drying on high heat. The felting allowed me to cut the tassels without any raveling. Felted wool cuts like butter! We used a low melt hot glue gun to add the hats, scarves, bells, buttons for eyes and the felted mouth. A super fun project!

Then in February, 2014, my granddaughter made this one with me during a visit in her home. She enjoyed it so much that when her next door neighbor friend visited she made one as well!
Monday, November 4, 2013
Craft: Sock Snowman

Attitude 4 Fitness/Paige Sterner's photo
How cute are these to make with the little ones?!!!!!!!!!!!
For this craft, you'll need a pair of old socks that are crew length, or longer, rice, rubber bands, map pins with heads, buttons, any left over fabric if you want for a scarf.
First, cut off the top of the sock from the foot.
Turn the sock inside out and attach a rubber band tightly to the top of the sock.
Then turn the sock right-side out again.
Fill the sock with rice. Make sure to pack it down as you go so the sock gets a nice round base.
Rubber band the top of the sock closed and put another rubber band 3/4 of the way to the top for the head of your snowman.
Now, decorate!
Tie a scarf around your snowman's neck and add eyes, nose, and buttons.
Use the toe of your cut socks to fashion a stocking cap. Or you could use colored argyle socks to create hats and sweaters for your snowman.
You can either sew or glue on your buttons, and add embellishments - twine, bows, ribbons, etc - as needed.
This is such a quick and easy craft - 10 minutes tops - that it would be simple to create a whole family of snowmen for your mantle!
Thursday, January 13, 2011
Creative Snow Play / Winter Sun Catchers
CREATIVE SNOW PLAY
by Lois Breneman, © 2002, Revised 2008, Heart to Heart
Growing up on a farm in Pennsylvania was great fun -- and work, of course, but in the winter we loved ice skating on our pond, sometimes having the church youth group or friends from Youth for Christ there for "crack-the whip," hot chocolate, snacks and a good time. Once when the ice was thick enough, we even had a bonfire at the edge of the pond!
My brother, Carl, and I had great fun building a snow fort once in the cow pasture when we were quite young, with walls about two feet tall to divide the rooms -- no roof. Our older sister preferred the indoors and our baby brother was too young at the time to join in the fun. We built a kitchen (even a kitchen sink) in our snow fort where we made "snow hamburgers," as we played "house." Later Carl went outside our fort and speared a pretend walrus for another meal!
Another day we decided that making a snowman was too ordinary, so we made a huge snow lion! We built igloos too, but if your children try this, be sure there is an adult with them, (outside the igloo), in case of a cave-in! We also had fun writing in the snow and making angels.
Since our frozen pond was at the bottom of a big hill in the cow pasture, sometimes we'd go sledding down the hill, up over the bank of the pond, slide across the pond and fly up over the other bank and down to the other side of the pasture! We also made snow speed bumps and ramps for a more exciting sled ride. No wonder we have aches and pains today, but I suppose the fun we had back then makes the aches and pains serve as good memories of our childhood!
After I was married and our three children were still at home, we had fun making a snow bear in our front yard, with two faces -- one facing our house and one facing the road, so we could enjoy it from inside our house as well as the people driving by. Then we went over to a neighbor's house and helped them make four more bears -- one for each of their family members. Another fun and easy idea would be to make a snow turtle. We've done this with sand at the beach, and snow would work well too. Be sure to draw a design on his back with a stick, then paint it in with water and different colors using food coloring or tempera paints.
Your children could also paint pictures in the snow using watercolors. Spray painting the snow is fun as well. As the snow melts, the colors will run together and that's fun to watch too.
Your children could also paint pictures in the snow using watercolors. Spray painting the snow is fun as well. As the snow melts, the colors will run together and that's fun to watch too.
If you want to build a unique snow man, snow lady or snow baby, trim them in a special way for a one-of-a-kind, out-of-the-ordinary snow person! For *eyes*, use large dark buttons attached with toothpicks, radishes attached with toothpicks, chunks of grilling charcoal or dark-colored stones. Nothing beats a carrot *nose*, unless you want to use a red radish to depict a very cold nose. The *mouth* could be made by bending a red, pink or orange pipe cleaner into a smile. Several cranberries or holly berries would also work for a mouth. For *ears*, cut a lemon or orange in half, scoop out the fruit to eat later, and attach each half with a few toothpicks around the edges of the rind. For *arms*, sticks will do, but you can also add extra snow close to the body for arms that come to the front in a handclasp. But since the *hands* are difficult to make, attach mittens in the front with toothpicks. Or have the snow lady or child hold something like a bouquet of silk or plastic flowers or a bouquet of fresh holly.
The man might hold a dish of birdseed (stick an unbreakable plate into the snowman's stomach -- ouch! -- just above his hands and fill with birdseed) or he might be a plumber, holding a plunger. The baby could hold a toy. The *scarf* should be of a bright, cheerful color. Even a piece of unfinished fabric will do fine. Or a substitute for a scarf might be a ribbon tied into a bow. The snow people's *hats* could be almost anything -- a stocking cap, a straw hat, a piece of fabric or a winter headband. Use strands of yarn or pine needles for *hair* sticking out from under the hats and for a snow baby, just a pipe cleaner curl sticking straight up! *Buttons* can be raisins, real buttons, cranberries or holly berries, all attached with a toothpick or they can be pieces of charcoal. Mom might even look good in an apron!
The man might hold a dish of birdseed (stick an unbreakable plate into the snowman's stomach -- ouch! -- just above his hands and fill with birdseed) or he might be a plumber, holding a plunger. The baby could hold a toy. The *scarf* should be of a bright, cheerful color. Even a piece of unfinished fabric will do fine. Or a substitute for a scarf might be a ribbon tied into a bow. The snow people's *hats* could be almost anything -- a stocking cap, a straw hat, a piece of fabric or a winter headband. Use strands of yarn or pine needles for *hair* sticking out from under the hats and for a snow baby, just a pipe cleaner curl sticking straight up! *Buttons* can be raisins, real buttons, cranberries or holly berries, all attached with a toothpick or they can be pieces of charcoal. Mom might even look good in an apron!
Or try building a snowmobile! The February, 2002 issue of the Family Fun Magazine told how to do this, and I added a few extra instructions. Since winter forts and snowmen are so common, why not upgrade to a fantastic snowmobile? A little extra "snow-how" (see directions below) and some household supplies make this baby purr. Once done, the kids can name their car (maybe Blizzard?) and go for a pretend joyride! It would be a good idea to gather the necessary supplies now for a snowmobile and other possible snow activities, so you have them handy when the snows come. Here are the directions:
1. The Body: Using a shovel, mound snow up to form the sides of the car. Fill in the hood and trunk areas. Pack it firmly and trim away excess snow with your shovel or an old cookie sheet. Once you've got the basic shape, it's a matter of customizing. Using a garden trowel or spackling knife, kids can add tail fins, extend the back to create a pickup-truck bed for carrying passengers or hauling snowballs. Or build a sporty design or a copy of your own car.
2. Engineering Factory Features: You can make a radio antenna with a willow twig, a stick for a stick shift, and dashboard indicators made from colorful laundry detergent caps or toy box odds and ends. The headlights can be two yellow or orange plastic cereal bowls or two halves of grapefruit rinds. The tail lights could be rubber balls or plastic cups. The wheels can be Frisbees or fancy wheels drawn on posterboard. Use a safe metal lid for the side mirrors or stick the handle of a hand mirror right into the snow. For a steering wheel, use a disposable plastic plate, cut in the center and mounted on a bottomless plastic bottle. Push that into the dash panel. Several twigs pressed vertically into the front of the car can be the grille. If your children have a bike horn, this would be a great addition! A plastic toy lion would work as the hood ornament. This snowmobile, of course, is a convertible, because you wouldn't want the roof to cave in!
3. Be sure to get several pictures with your children driving! Smaller children can be lifted into the car by a teen or adult, so it doesn't get ruined. Ladies, please be sure to send me a picture of the snow creations that you and your children make! Or at least tell me about them. I just wish Carl and I would have had these snowmobile directions back in our childhood years!
WINTER SUN CATCHERS
by Julie Druck, Editor of "A Heart for Home," a monthly e-mail newsletter for families.
To subscribe, send a blank e-mail to: aheartforhome-subscribe@welovegod.org
My sister-in-law, Amy, threw an impromptu ice skating party last year when their pond froze over. She and I helped each of our sons make these lovely sun catchers to hang in the branches of one of her trees. They looked magical!
Here’s how: Place a sturdy disposable foil pan (or better yet, two inside of each other) on a cookie sheet. Arrange orange rounds, cranberries, small pinecones and small pieces of pine branches in the pan and add enough water to cover them. To hang them, cut sturdy twine into 2 lengths for each sun catcher (about 2 ft. each). Lay one end of each piece of twine in the pan, submerging it at least several inches. Place the pan in the freezer and store overnight or until frozen. Remove the ice block from the pan (run a bit of warm water over the back if needed) and tie it to a tree with the ends of the twine. It’s best to do this when the weather is very cold, so that the sun catchers don’t melt too quickly. You could put them back in the freezer for another time if you want.
Monday, January 3, 2011
Tips and Tidbits
Leg Warmers for Little Girls ~ Thanks to Debbie Klinect in Florida for this tutorial link! Basically you buy a pair of socks for women, cut off the foot section, turn up the raw edge of the leg portion, and slip stitch (hand sewing). The leg warmers can be worn over top of tights, other socks, or under pants. Very cute! Actually you could also make leg warmers from old sweaters, using the sleeves. Actually, why leave out the little boys here? Make them some as well!
http://tearosehome.blogspot.com/2009/09/tutoriallittle-girls-leg-warmers.html
Cleaning Stove Vents ~ As dust and grease builds up in hard-to-reach areas such as stove vents, cover a table knife with a wet, soapy, and rung out cleaning cloth, and go to work. It works!
http://tearosehome.blogspot.com/2009/09/tutoriallittle-girls-leg-warmers.html
Cleaning Stove Vents ~ As dust and grease builds up in hard-to-reach areas such as stove vents, cover a table knife with a wet, soapy, and rung out cleaning cloth, and go to work. It works!
FUN WINTER CRAFTS
www.familycorner.com - Used by permission
www.familycorner.com - Used by permission
Monday, December 20, 2010
Winter Fun & Fun Salad
WINTER FUN / LOOKING FORWARD TO SPRING
Collecting Snowballs Fun ~ A fun game to print and play. A way of teaching math to young children.
Fan-Tastic Snowflakes ~ Accordion fold paper to create snowflakes! Very pretty!
Nesting Shelf Project ~ This easy-to-make nesting shelf is the perfect project for your first birdhouse. It’s ideal for attracting robins this spring.
A FUN SALAD FOR THE KIDSHave your children help make this salad with you - even the tiny tots can help!
Body: fresh or canned peach half
Arms and legs: small celery sticks
Head: half a hard cooked egg
Eyes, nose, shoes, buttons: raisins
Mouth: piece of a cherry or dried cranberry (spread out some)
Hair: grated yellow cheese
Skirt: ruffled lettuce leaf
The "skirt" is placed under the peach half (a pear would also work).
The "buttons" are placed on the peach half "bodice."
For the head you place the yolk down so only the white shows for the face.
You could use very finely grated/shredded carrot for the hair instead of the cheese.
Subscribe to:
Posts (Atom)